How to Open a Port in CSF Firewall via WHM: A Step-by-Step Guide
How to Open a Port in CSF Firewall via WHM: A Step-by-Step Guide
Open a Port in CSF Firewall via WHM – If you’re managing a server using WHM (Web Host Manager) and need to open a port in the CSF (ConfigServer Security & Firewall) firewall, this guide will walk you through the process. Opening ports is essential for enabling various services and applications to communicate through your firewall. Follow these steps to configure CSF and ensure your server operates smoothly.
What You Need to Know Before You Start
CSF is a popular firewall configuration tool for servers that use cPanel. It helps manage server security by controlling incoming and outgoing traffic. WHM is the administrative interface that allows you to configure CSF and other server settings.
Open a Port in CSF Firewall via WHM – Step-by-Step Instructions
1. Log in to WHM
- Open Your Browser: Navigate to
https://your-server-ip:2087. - Enter Credentials: Log in with your root username and password.
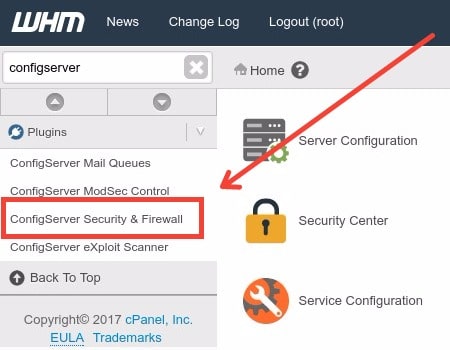
2. Find CSF Configuration
- Search for CSF: Use the search bar in WHM to type “CSF” or “ConfigServer.”
- Access CSF Interface: Click on “ConfigServer Security & Firewall” from the search results or the Security section of the WHM menu.
3. Navigate to Firewall Configuration
- Open Configuration Tab: In the CSF interface, locate and click on the “Firewall Configuration” tab. This section allows you to modify various firewall settings.
4. Add the Port to the Allowed List
- Locate Allow Incoming Ports: Scroll down to the “Allow Incoming TCP Ports” section. This is where you specify which ports should be open for incoming connections.
- Add Your Port: Enter the port number you want to open. For example, if you need to open port 8080, simply add
8080to the list. If you need to open multiple ports, separate them with commas (e.g.,8080, 9090).
5. Configure Outgoing Ports (if necessary)
- Locate Allow Outgoing Ports: If your application requires outgoing connections on specific ports, find the “Allow Outgoing TCP Ports” section.
- Add Ports: Enter the port numbers in the same manner as for incoming ports.
6. Save Your Changes
- Scroll Down: After adding the necessary ports, scroll to the bottom of the page.
- Click Change: Press the “Change” button to save your modifications.
7. Restart CSF for Changes to Take Effect
- Return to CSF Main Page: Go back to the CSF main interface.
- Restart Services: Click on the “Restart csf+lfd” button. This action applies your changes and restarts the firewall and login failure daemon.
Tips and Troubleshooting
- Syntax Errors: Ensure there are no typos or syntax errors in the port entries.
- Conflicting Rules: Check if other firewall rules might conflict with your new settings.
- Service Validation: Verify that the service or application requiring the open port is properly configured and running.
Conclusion
Open a Port in CSF Firewall via WHM – Opening a port in CSF via WHM is a straightforward process that can be crucial for your server’s functionality. By following these steps, you ensure that necessary ports are accessible, allowing your applications and services to communicate effectively. Always remember to verify your changes and monitor server performance to maintain optimal security and functionality.
For any advanced configuration or persistent issues, consulting CSF documentation or seeking assistance from your hosting provider might be beneficial.